File .dat and profile management

The Profiler is the launching base of clrmamepro!
We will detail button by button each possibility.
What is a profile?
It is simply a list of games loaded from a .dat file or an executable with memorized settings.
Clrmamepro needs to know where your rom directories are and how to scan them.
We will detail button by button each possibility.
What is a profile?
It is simply a list of games loaded from a .dat file or an executable with memorized settings.
Clrmamepro needs to know where your rom directories are and how to scan them.
|
For beginners:
If, for you, all this seems complicated, follow the indications given when launching clrmamepro for the first time. 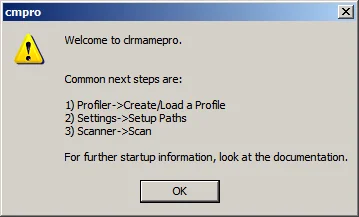 So go through Add datfile or Create, then Settings, then Scanner.<br />This tutorial has nevertheless a logical sequence, if you follow progressively the explanations from the beginning to the end, the result will be even better.
|
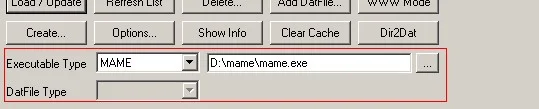 Quick information on the selected profile.
You can use the box to select a different executable, it's practical:
Highlight your profile, change the name of your executable or browse your directories until you find it, then do Load/update. The profile is up to date.
Not bad, isn't it?
- Create... : Create a profile using an executable
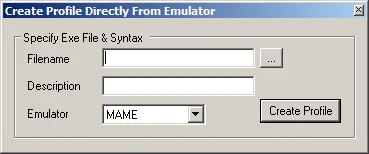
- Filename : Indicate the path of your emulator's executable.
- Description : Give a name to your profile.
- Emulator : Choose the emulator type in the dropdown menu (on the example it's mame.exe). For those not in it, it will have to be .dat files (see Add datfile).
- Create profile : Creation of the list of games and the profile using the selected executable.
 Warning:
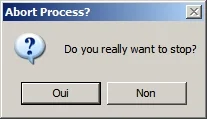
At any time, when clrmamepro launches a process, you can cancel the operation and this is almost always possible in all cases (scan, rebuild, merge, un-merge, update...).
 If the executable is not an emulator supported by this function or does not correspond to the choice of the dropdown menu, if the executable and the corresponding profile are already in your list, you will also be warned.
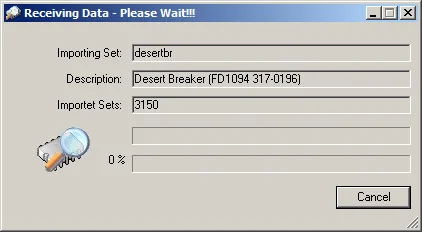
- Add datfile... : Add a .dat file
Select your compressed or non-compressed file.
You can create it wherever you want, in Root or in a new folder with Create dir...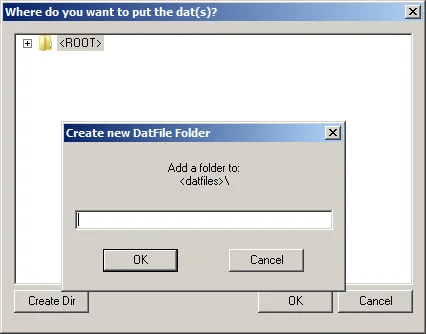 The drag-and-drop of .dat files or a folder containing .dat files is possible to the two windows of the Profiler.
If there are several .dat in the zip, select the right file.
Then you have nothing more to do than load it from New datfile.If you decide to place it in a folder where it already exists, you will be warned.

This will also be the case with the use of the www mode, of course.
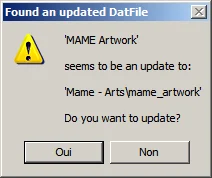
Beware if you already have this .dat file and you place it in another folder, clrmamepro will offer you to update.
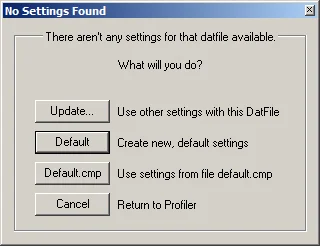
You will not need to reconfigure the paths and the cached information will be kept, choose the action to perform (Update..., Default, Default comp, Cancel (see Load/update)).
This will also be the case with the use of the www mode, of course.The list of games will be created.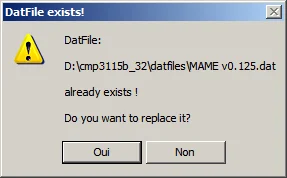
 For beginners:
For .dat files « Mame arts » (flyers, cabinet, snap...):- Example the easiest with the flyers:
This solution requires more system resources. The emulator or Frontend must handle this compression, which creates slowdowns at the display of photos even on the largest PCs.
All flyers must be compressed in the same archive named 'flyers' (all GUIs (of mame) support compressed photos and it saves space).
Place the archive in the flyers folder.
Rom-path becomes "your_path\flyers". - Example the least easy with the flyers:
This solution requires less system resources. The emulator or Front-End will no longer have to handle any compression of images, so no slowdowns at the display of photos on the smallest PCs.
Decompress all images directly in your flyers folder.
Rom-path becomes "your_path", mame in particular or then the root directory where your flyers folder is placed.
Go to Settings then:- Exclude-paths: Remember all folders located in the root directory where your flyers folder is placed.
- Unneeded Mask: Remember all file extensions located in the root directory where your flyers folder is placed.
- Example the easiest with the flyers:
- Load/update : Load one or several selected profile(s), ...
- Cancel : Cancel
- Default.cmp : Use the default configuration (see Settings)
- Default : Create a new configuration
- Update : Use the configuration of an existing .dat file
Select your .dat in the list.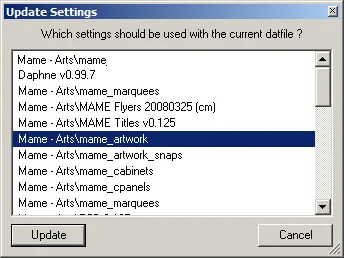
Warning the old .dat will be deleted! It's kind of an update.
The list of games will be created.
- Refresh : Refresh the list of profiles, everyone has understood
- Delete : Delete the selected profile(s)
- Clear cache : Unload a profile or « the memory » of clrmamepro
For each profile, clrmamepro loads all the information related to the profile, it creates a file where it stores this information, this button serves to delete this file.
It turns out that sometimes, despite modifications on a .dat, clrmamepro uses what it has in memory and not the new .dat file.
I use it between each change of profile.
- Options... : Common settings for all profiles
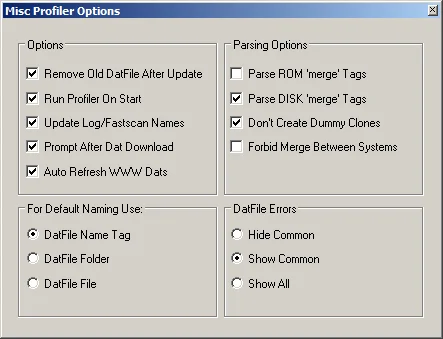
- Remove old datfile after update : Checked. Delete the old .dat when an update is done.
- Run profiler on start : Checked (up to you to choose). Launch the profiler at the start of clrmamepro.
- Update log/fastscan names : Checked. Update the names of the log and fastscan files when an update is done.
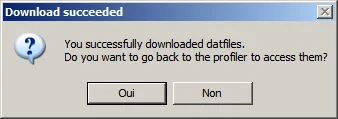
- Prompt after datfile download : Checked, up to you to see, according to your need. Ask if we want to return to the profiler after the update via www mode.
- Auto refresh www dats : Checked, up to you to see, according to your need. Update the .dat when you enter the www mode.
- Parse rom - disk 'merge' tags : Checked. Verify the tags (crc and sizes...) when the files are merged to avoid duplicates.
Mode Non-merged Split Parse + Split Merged Parse + Merged Parent rom 1 name qwer crc 123
rom 2 name azer crc 456rom 1 name qwer crc 123
rom 2 name azer crc 456rom 1 name qwer crc 123
rom 2 name azer crc 456rom 1 name qwer crc 123
rom 2 name azer crc 456
rom 2 name qsd crc 456
rom 3 name sss crc 555rom 1 name qwer crc 123
rom 2 name azer crc 456
rom 3 name sss crc 555Clone rom 1 name qwer crc 123
rom 2 name qsd crc 456
rom 3 name sss crc 555
rom 2 name qsd crc 456
rom 3 name sss crc 555
rom 3 name sss crc 555The rom 1 is parent with the same name and the same crc so it is not kept in double, the rom 2 has the same crc but a different name, so it is kept, in double.
This option allows to avoid this and to keep only one version of the rom 2.
This option was added after many requests from users who noticed these duplicates.
For simplicity, I did not mention the size which also enters into account.
See Merger and Scanner for more information on Merged, Non-merged and Split.- Don't create dummy clones : Checked. Allow or not the creation of a clone identical to the parent.
- Forbid merging between systems : Checked. Prohibit the parent/clone relationship between different systems (systems = bios).
- For default naming use : Up to you to judge, according to your need. Use the name of the .dat, or the name of the folder where the .dat is, or the description of the .dat when creating or updating a profile.
- Datfiles errors : Up to you to judge, in my opinion trust clrmamepro.
At creation or launch of a profile, clrmamepro informs on possible 'errors'.
Choose if you want to be informed and interact.
I think it is better to click on yes if you are not sure...
Among other things:- Keep the roms identical at the level of their names but with different crc32 by renaming them.
- Use samplesset where the parent does not exist.
- In the case of nodumps, use the hash values of roms corresponding at the level of their names found in the clones or parent.
- Erase the parent/clone relationship, if the roms of the clone are identical at the level of their names to that of the parent. The clone will have the roms of the clone and the parent, in addition to the parent.
Options necessary in the case of set Full-Merged...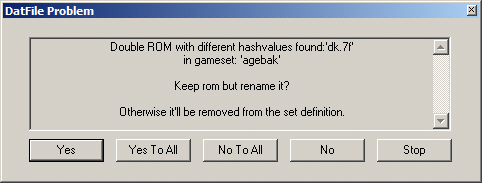
- Show info : Show the information of the selected profile
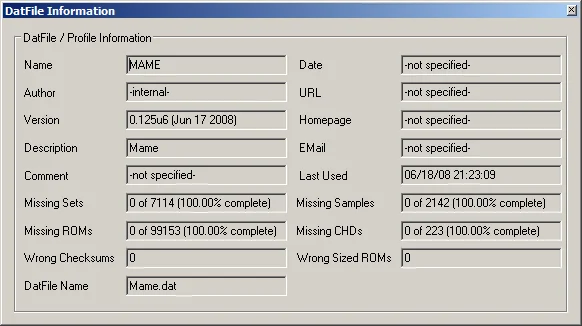
- Name : Name of the emulator.
- Author : Author of the .dat file. If you have used Create, Internal will be displayed.
- Version : Version of the emulator.
- Description : Name and version of the emulator, normally.
- Comment : Comments if any.
- Missing sets : Summary in numbers and percentage of missing sets.
- Missing roms : Summary in numbers and percentage of missing roms.
- Wrong checksums : Number of files with the wrong crc.
- Datfile name : Name of the .dat file created in the clrmamepro directory.
- Date : Creation date.
- Url : URL of the .dat file if any.
- Homepage : Site of the author of the .dat file if any.
- Email : Email address of the author of the .dat file if any.
- Last used : Last loading in clrmamepro.
- Missing samples : Summary in numbers and percentage of missing samples.
- Missing chds : Summary in numbers and percentage of missing chds.
- Wrong sized roms : Number of files with inexact size.
- WWW mode : This is a .dat file download manager
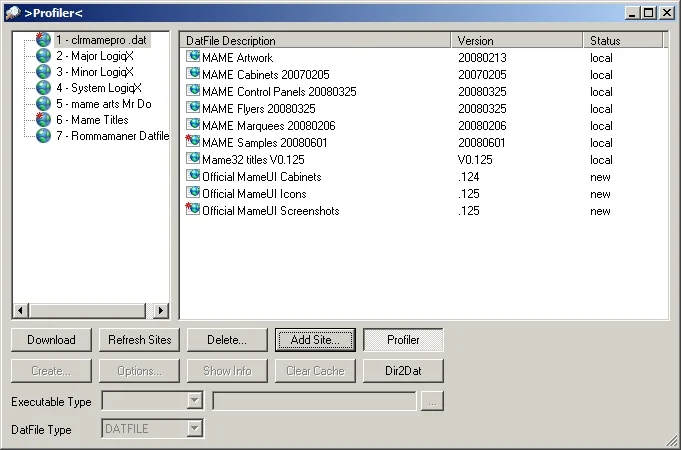 Note the different statuses:
- New : The selected .dat is not in your list of profiles.
- Old : The selected .dat is older than yours.
- Update : The selected .dat is newer than yours.
- Local : The selected .dat is the same as yours.
Very practical this business!
Clrmamepro updates everything automatically (if you have checked the option), it's very practical all this!
Ahhh, it's good when there's nothing to do!
You have nothing more to do than make your market!
In addition, if a new .dat file is available for download, you will easily know it thanks to the small red dot displayed on the small globe and on the .dat file in question.
The sites and addresses you have memorized are recorded in a file named wwwdats.ini.
You can save it and, in the event of a future uninstallation and reinstallation, make a drag & drop of the file. All your information will be taken into account.
You can create an ini file manually but this does not present great interest (a line represents a site).- Add site : Allows you to add URLs.
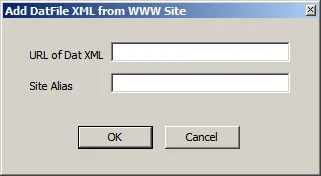
- Url of the dat : URL of the .dat file (xml), compressed or not.
The URL must lead to a zip, .dat or .xml file.
The principle is that these URLs never change, it's better, question of comfort.
If you are forced to change the URLs every week, it's not going to work.
Well, the URLs... let's say "official":
- http://www.clrmamepro.com/mamedats.zip
- http://www.logiqx.com/Dats/RecentEmus.zip
- http://www.logiqx.com/Dats/OlderEmus.zip
- http://www.logiqx.com/Dats/Systems.zip
- http://www.mameworld.net/mrdo/cmp.xml
I take the opportunity to give you two interesting addresses (I don't use them, personally I'm more arcade; Warning, these are not the permanent respective URLs):- http://www.tosec.org
- http://rmanager.free.fr/download.html
- Site alias : Represents the name you want to give to the URL...
- Url of the dat : URL of the .dat file (xml), compressed or not.
- Delete... : Everyone has understood... Delete the selected URL.

- Refresh sites : Everyone has understood... Refresh and re-download the .dat files from the selected URL.
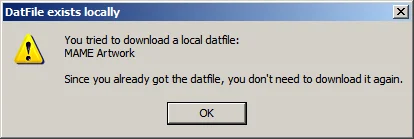
- Download : Download the selected .dat file (where you want in the profiler...), double-clicking also works.<br />You will get this to confirm the successful completion of the operation (if you have checked the option).<br />You have nothing more to do than load the .dat in New datfiles...<br />If it's not a .dat file you already have
- Dir2dat : Strangely Dir2dat is available in the www mode! (see Dir2dat in Profiler a little lower).
- Right click on www mode:
- Left window:

- Refresh datfile from: 'alias' : Refresh the list of .dat files from the selected alias.
- Edit... : Change the name of the alias or the URL (very practical!)
- Right window:
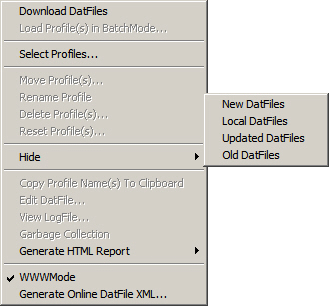
- Download datfiles : Download the .dat
- Select profiles... : Download the .dat
- Hide... : Hide following the status of the .dat file (see www mode a little higher):
- New datfiles
- Local datfiles
- Updated datfiles
- Old datfiles
- Generate html report : Generate an html report as a file, not grayed out but not available for www mode.
- www mode : Uncheck the option to return to the profiler.
- Generate online datfile xml : Generate an xml file .dat online: See Right click on Profiler.
- Left window:
- Dir2dat : Create a .dat file from a source folder
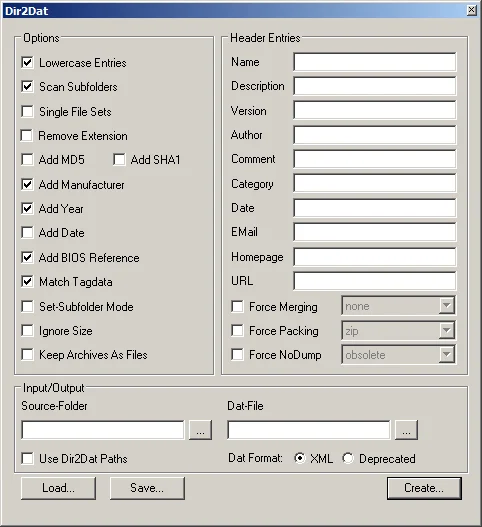 All the information concerning the roms (names, sizes, crc32, sha1 or md5) will be well added in your .dat file.
As for the relationship parent/clone or bios, unfortunately, it's not the same thing...
Also, to have all the information (manufacturer, description, year...), it is necessary to previously load the profile corresponding to the source folder (having all the information of the profile in cache), otherwise it will be the complete desert.
I maintain that clrmamepro is light on this option. Forget this function and use rather a software like DatWorkshop for this operation.- Headers entries : Information written in the header of a .dat file, available in the profiler among others.
- Name : Name of the emulator corresponding to the .dat file.
- Description : Description of the .dat file! (see Match tagdata otherwise the name of the archive will be taken into account).
- Version : Version of the .dat file!
- Author : Name of the author of the .dat file.
- Comment : Comments of the author if any.
- Category : Class the .dat file in a category (name of the emulated machine, for example).
- Date : Creation date.
- Email : Email address of the author of the .dat file if any.
- Homepage : Site of the author of the .dat file if any.
- Url : URL of the .dat file if any.
- Force merging : Force to merge even if the emulator does not support it (no, split or merged).
- Force packing : Force to compress even if the emulator does not support it.
- Force nodump : Management of nodumps.
- Obsolete : the nodumps are marked Unneeded, the missing files are not displayed.
- Ignore : the existing nodumps are marked Unneeded, the missing files are not displayed.
- Required : the existing nodumps are marked Unneeded, the missing files are displayed.
- Options : All the information on the games, the files, the roms.
- Lowercase entries : Everything will be written in lowercase.
- Scan subfolders : clrmamepro will scan the subfolders.
- Single file sets : If a decompressed file is found, it will be placed in an archive bearing the name of the folder. With this option, the archive will bear the name of the file in question.
- Remove extension : Keep or not the extensions of the archives, if any.
- Add md5 : Include the md5 test.
- Add sha1 : Include the sha1 test.
- Add manufacturer : Include the name of the manufacturer (see Match tagdata).
- Add year : Include the year of release of the game (see Match tagdata).
- Add date : Include the creation date of the files (roms).
- Add bios reference : If the profile corresponding to the source folder is loaded, all the information on the bios (Resource) will be added.
- Match tagdata : If the profile corresponding to the source folder is loaded, all the information (manufacturer, description, year...) will be added.
- Set-subfolder mode : If an archive contains subfolders, this information will be used in the .dat file. If the subfolders are decompressed, they will be placed in the same archive (in the .dat file).
- Ignore size : The size of the files will be ignored!
- Keep archive as file : The content of the archive will not be explored. The archive will represent one file.
- Input/output :
- Source folder : Choose your source folder (your roms folder or your Rompath folder).
- Dat-file : Destination file and folder.
- Use dir2dat paths : Dir2dat paths will be used as source folder if you have configured it (see Settings).
- Dat format : Xml or Deprecated. Choose between the .dat file format (available since clrmamepro 3.112) or the old .dat file format.
- Save... : Save your current Dir2dat configuration to a file (where you want).
- Load : Load a Dir2dat configuration file.
- Create... : Launch the operation.
- Headers entries : Information written in the header of a .dat file, available in the profiler among others.
- Right click on Profiler
Access to many options... I will be brief on the simplest options.
- Left window
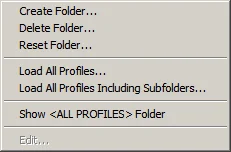
- Create folder... : Create a directory.
- Delete folder... : Delete a directory.
- Reset folder... : Reset the content of a directory and set the profile to Not scanned yet.
- Load all profiles... : Load all profiles, in batchrun mode.
- Load all profiles including subfolders... : Load all profiles, including those in subfolders, in batchrun mode.
- Shows <all profiles> folder... : Show the All profiles folder.
All profiles will be in the same folder. It follows the logic of the All Users folder of Windows. - Edit... : Grayed out, and unavailable!
- Right window
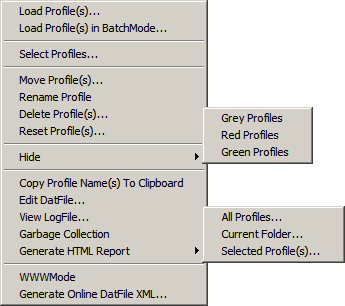
- Load profile(s)... : Load the selected profile(s).
- Load profile(s) in batchmode... : Load the selected profile(s) in batchrun mode (see the paragraph below).
- Select profiles... : Select one or more profiles following a criterion (a mask, a value, a string). It's kind of a search engine.
- Move profile(s)... : Move the selected profile(s), it's also possible with a drag & drop.
- Rename profile(s)... : Rename the selected profile(s).
- Delete profile(s)... : Delete the selected profile(s).
- Reset profile(s)... : Reset the selected profile(s) and set the profile(s) to Not scanned yet.
- Hide : Hide the profiles:
- Grey profiles : Not scanned or not used.
- Red profiles : Incomplete rom sets.
- Green profiles : Not scanned or not used.
- Copy profile name(s) to clipboard : Copy the name(s) of the selected profile(s).
- Edit datfile... : Edit the selected .dat file.
- View logfile... : View the log file of the profile (it must be previously created!).
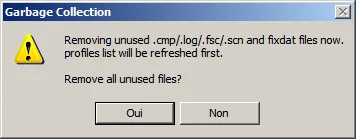
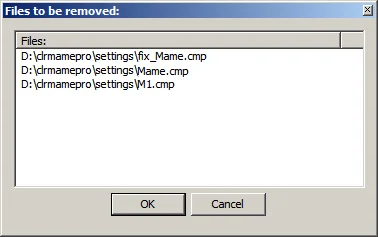
- Garbage collection : Delete the .cmp, .log, .fsc (fastscan) and .scn (scan) files not used. If you manually delete a .dat file, some files may become useless.
- Generate html report : Generate an html report as a file (practical and very readable):
- All profiles... : For all profiles.
- Current folder : For all profiles in the current folder.
- Selected profile(s)... : For the selected profile(s).
- www mode : Switch to www mode.
- Generate online datfile xml : This option will be used to generate an xml file containing information on the .dat files.
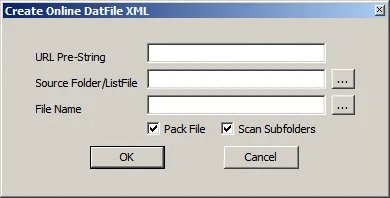 This allows, if you have a website, if you are an emulator developer or if you simply want to, to offer the .dat files to the internet users.
This file can, for example, be used in the www mode.- Url pre-string : Represents the address on your site or FTP where you will make your .dat files available.
- File name : Choice of the folder (on your disk) where the file will be created.
- Pack file : The file will be compressed.
- Scan subfolders : Search in the subfolders.
- Source folder/Listfile : Choice of the folder containing the .dat file(s) or a list of files. Warning: the name of the file will be taken into account, as well as the folder!
Therefore it gives urlprestring + Source folder/Listfile
Example:- Url pre-string:
- http://www.monsite.com/docs
- Source folder/Listfile:
- C:\Datfiles\Nebula1.5.dat
- C:\Datfiles\FBAv0.1.dat
- You will get these addresses in your xml file:
- http://www.monsite.com/docs/Datfiles/Nebula1.5.dat
- http://www.monsite.com/docs/Datfiles/FBAv0.1.dat
Or put your files at the root of a disk but clrmamepro will scan the whole disk!
Or edit the .xml file by hand, it's still simple...
Now you have nothing more to do than put your zipped or unzipped xml file online where you want and spread this download address.
The principle is to have a constant address, to remake the xml file (bearing the same name) with more recent .dat files.
It is on this principle that the urls that I gave in Add datfile work... - Url pre-string:
- OK / Cancel : Launch or cancel the operation
- Appendix: batchrun mode
Profile batchrun allows you to load one or more profiles at once, scan or rebuild everything at once, if you update several profiles at the same time, automate the task...
Well, this is a bit of a pointed option, not because of its complexity..., but its usefulness is not present for everyone.
Only the experts will use the batchrun mode.
I advise the most novice among us to forget this option.
We will of course find almost all the options of the Scanner and the Rebuilder.- Scanner : Configuration of the Scanner
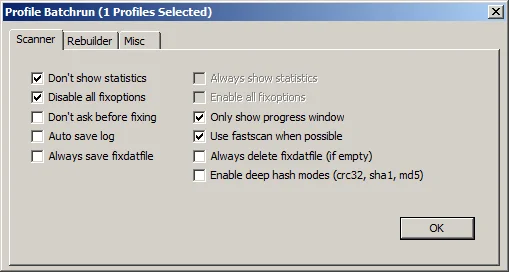
- Don't show statistics : The statistics screen will not be displayed.
- Always show statistics : The statistics screen will be displayed.
- Disable all fixoptions : clrmamepro will not fix any problem.
- Enable all fixoptions : clrmamepro will fix all problems it can manage.
- Don't ask before fixing : Fix problems without confirmation.
- Only show progress window : Only show the small progress windows.
- Auto save log : Automatically save a log file.
- Use fastscan when possible : A fastscan will be performed if possible (a scan must have been performed at least once before).
- Always save fixdatfile : A fixdatfile will be saved if there are problems (in the fixdats folder of the installation folder of clrmamepro).
- Always delete fixdatfile (if empty) : The fixdatfile will be deleted if you have checked Always save fixdatfile and if it is empty.
- Enable deep hash scan mode (sha1 / md5 / crc32) : This is the same option as Deeper check for fixable missing files. See Scanner in the advanced options.
- Rebuilder : Configuration of the Rebuilder. It is necessary to have Rompath - or - Destination previously configured, in Settings - or - the rebuilder - or - here in Use destination folder - or - in Create Rompath for new dat.
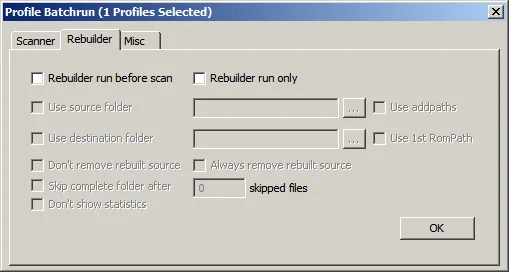
- Rebuilder run before scan : A rebuild will be launched before each scan.
- Rebuilder run only : Only the Rebuilder will be launched (no scan).
- Use source folder : Choose a precise source folder (for all loaded profiles). If you do not check this option, clrmamepro will use the last remembered folder in the Rebuilder of each profile. In the case where no folder is remembered and if you do not check this option, no action will be performed.
- Use Addpaths : Use Addpaths as source folder (see Rebuilder and Settings).
- Use destination folder : Choose a different destination folder than the one configured in the Rebuilder of each profile. If no folder is remembered, clrmamepro will use the Rompaths folder of each profile.
- Use 1st rompath : Use the folder configured in 1st rompath as destination folder (see Rebuilder and Settings).
- Don't remove rebuilt source : The source files will not be deleted (if this option is chosen in the Rebuilder of each profile, see Rebuilder).
- Always remove rebuilt source : Always delete the source files (even if this option is not checked in the Rebuilder of each profile, see Rebuilder).
- Skip complete folder after XXXX skipped files : Stop a rebuild if "so many" files have been ignored in the same directory. You decide how many represents "so many". This option allows you to stop the scan of the current directory without stopping the rebuild. It's not bad, it can be useful, but it's not necessarily logical, nor necessarily useful...
- Don't show statistics : The statistics screen will not be displayed.
- Misc : General options
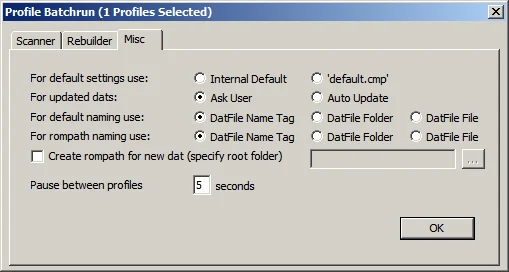
- For default setting use : Use the configuration:
- Internal default : clrmamepro will use the internal settings of clrmamepro.
- 'Default.cmp' : clrmamepro will use Default.cmp of the profile if it exists.
- For updated dats : In the case of an update of a .dat file.
- Ask user : clrmamepro will ask before acting.
- Auto update : clrmamepro will update the .dat file without asking permission!
- For default naming use : The fastscan, logfile and rompath files will bear the name:
- Datfile name tag : The name inscribed in the tag of the .dat file will be used.
- Datfile Folder : The name of the folder where the .dat file is located will be used.
- Datfile file : The name of the .dat file will be used.
- For Rompath naming use : If you check Create rompath for new dat...
- Datfile name tag : Rompath will bear the name inscribed in the tag of the .dat file.
- Datfile Folder : Rompath will bear the name of the folder where the .dat file is located.
- Datfile file : Rompath will bear the name of the .dat file.
- Create Rompath for new dat : A Rompath folder will be created, scanned, or rebuilt...
This folder becomes the rompaths folder of each profile (with the subfolder configured above). - Pause between profiles : clrmamepro will pause between each profile for "so many" seconds.
- Ok : Launch the operation.
- For default setting use : Use the configuration:
- Scanner : Configuration of the Scanner
- Left window